Windows 365 End-User Experience (Tips & Tricks) – Part 1. Connection experience
02-06-2023 9:46 AM
BEFORE YOU BEGIN
Disclaimer: All information and content in this blog post is provided without any warranty whatsoever. The entire risk of using this information or executing the provided content remains with you. Under no circumstances should the mentioned persons or vendors, the author, or anyone else involved in creating these blog posts be held liable for any damage or data loss.
Welcome to Part 1 in this new Windows 365 End-User Experience blog series. This series will be an educational journey exploring several features that can potentially help improve the end-user experience. Below you’ll find all parts of this blog series.
In this part, I’ll cover the following topics.
Introduction
What is a good Windows 365 Cloud PC end-user experience? – I guess the answer depends on who you ask. But in general, I believe that a good end-user experience is user-centered, focused on creating value for the user, and allows them to be productive and accomplish their goals efficiently. In other words, the Windows 365 Cloud PC must perform just as well as a physical endpoint, be reliable, and be accessible from anywhere with very little latency! That’s why in this blog series, I’ll explore various features that can enhance the end-user experience of Windows 365.
Note: Some basic Windows 365 recommendations about hardware requirements and choosing the right Cloud PC model type (SKU) size are available on Microsoft Learn. See more here. – End-user hardware requirements in Windows 365 | Microsoft Learn – Windows 365 size recommendations | Microsoft Learn
What else can we do besides the above recommendations to provide a great end-user experience Well, let’s see. In Part 1, we’ll look at the importance of choosing the best Azure region and how Remote Desktop Protocol (RDP) Shortpath further reduces the round-trip time (RTT). Then, throughout the rest of this blog series, we’ll touch upon other areas like Multimedia Redirection (MMR), Microsoft Teams optimization, Single Sign-on (SSO), etc. ** This blog series concludes by examining which tools we have at our disposal for monitoring the Windows 365 Cloud PC performance. – So, buckle up and enjoy the ride! ** Throughout this blog series, please look at the Table of Contents to your right for a complete overview of the content in scope.
Choosing the best Azure Region
One of the most common reasons for a poor Windows 365 end-user experience is caused by choosing the wrong Azure region for the Windows 365 Cloud PCs. Therefore, it’s essential to identify where your end users are geographically located during the initial Windows 365 planning to choose the Azure region that offers the lowest round-trip time (RTT) for your Cloud PCs. See Supported Azure regions for Cloud PC provisioning.
Round-trip time (RTT)
What is round-trip time (RTT)? The term round-trip time (RTT) refers to the time it takes a packet of data to travel from its source to its destination and back again. RTT measures in milliseconds (ms) and can be affected by several factors, including the distance between source and destination, the number of routers or switches the packet must pass through, and any congestion or network traffic along the way. In general, a lower RTT is preferable because it means data is transmitted quickly and efficiently, whereas a high RTT can lead to slower network performance, increased latency, and a poor Windows 365 experience for the end users. – To ensure a good Windows 365 experience, the RTT should be less than 100 ms. The expected Windows 365 experience (based on RTT). Good: Less than 100 ms. Average: 100-200 ms. Poor: More than 200 ms.
Let’s look at the difference between the wrong and the best choice of Azure region for Windows 365 Cloud PCs and what it does to the RTT. – Next, we’ll look at the provisioning policy and where to change the Azure region if you mistakenly chose the wrong one. In this example, I “accidentally” chose an Azure region in the US, causing a high RTT.
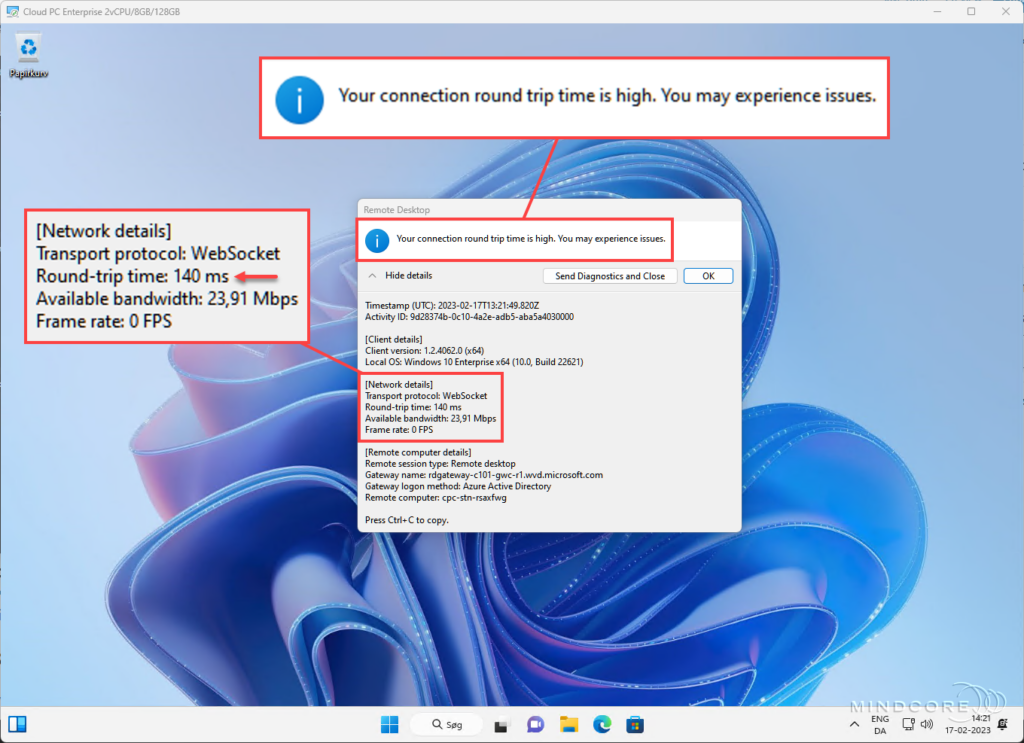
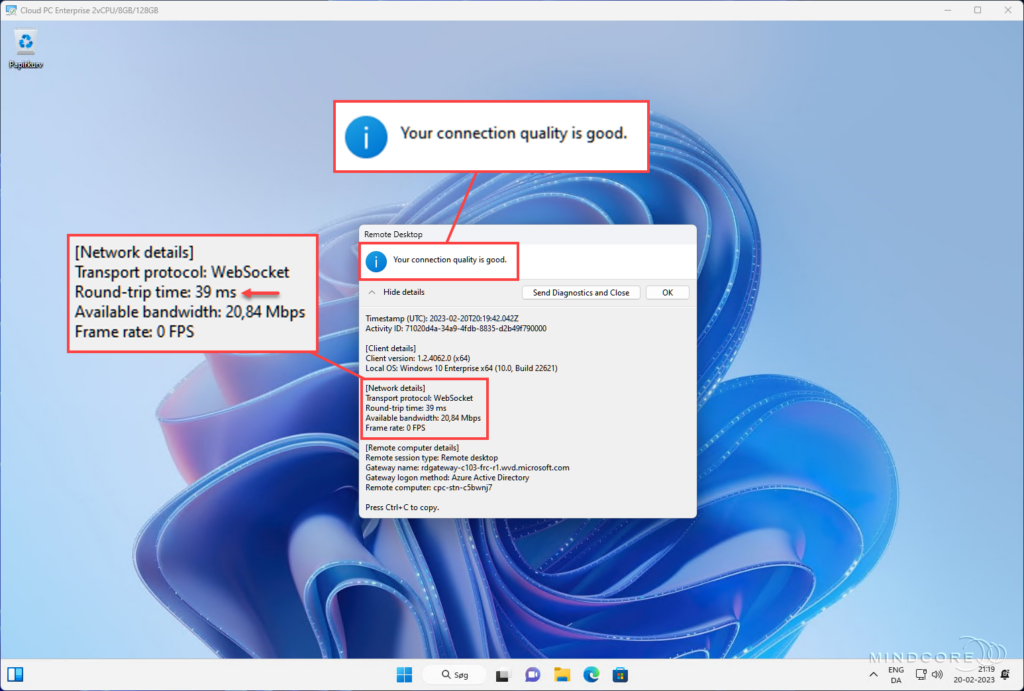
Then I changed it to the Azure region closest to my home and gained a much better RTT.
Changing the Azure region
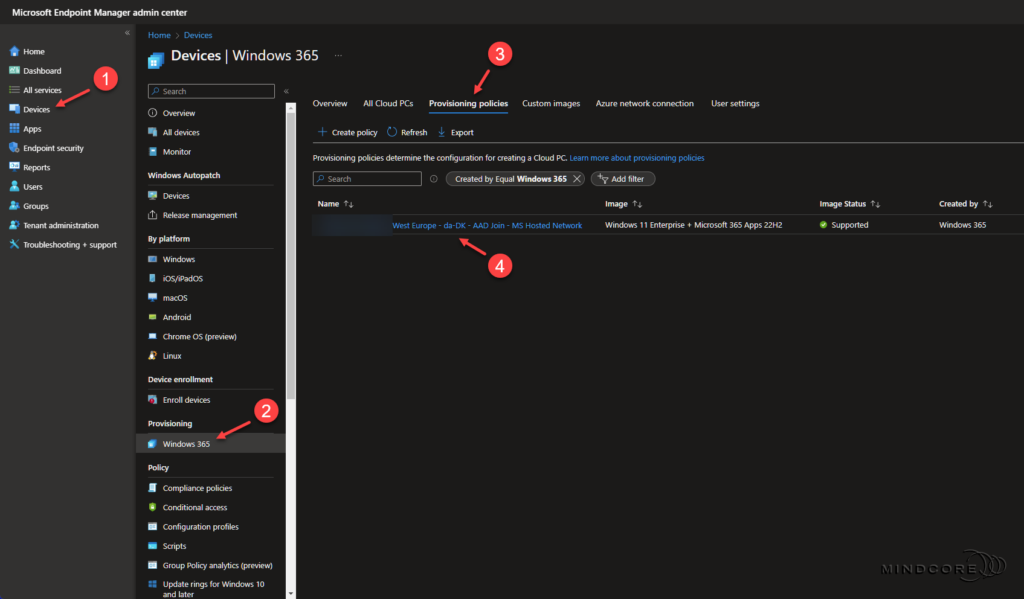
Let’s visit Microsoft Intune to see how I changed the Azure region in my provisioning policy. Go to https://intune.microsoft.com In the left pane, click Devices | Windows 365 | Provisioning policies Create a new policy or select an existing policy in the list of provisioning policies. – For this post, I chose to modify my current provisioning policy.
On the overview page, look for General and click Edit.
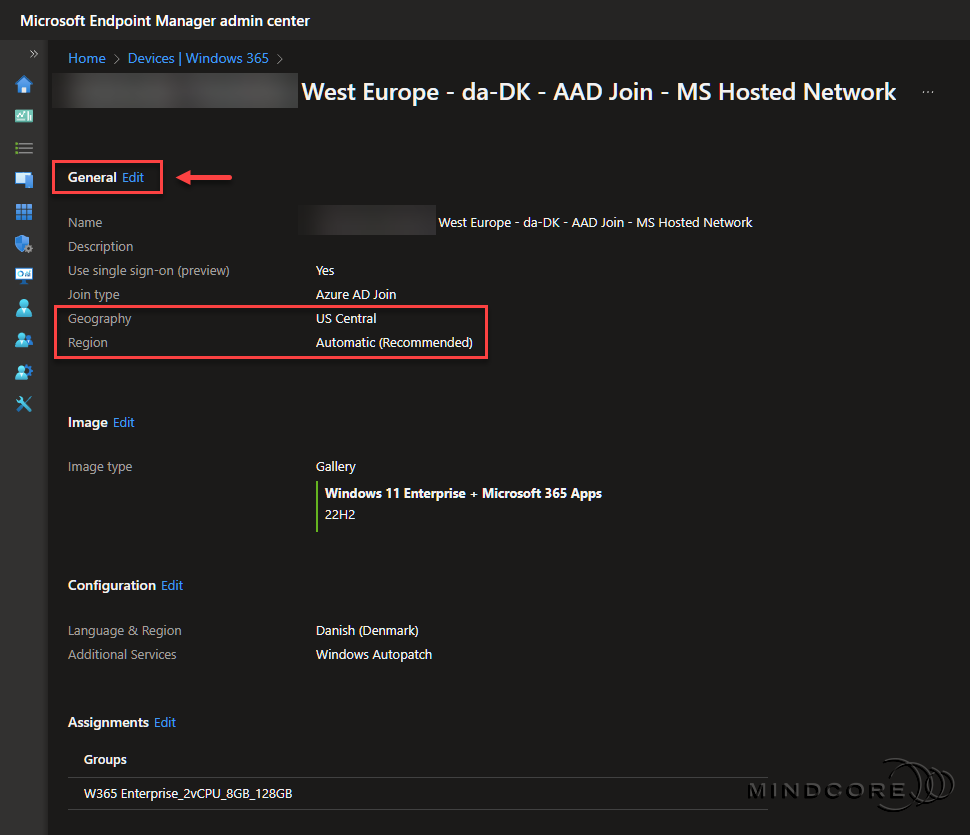
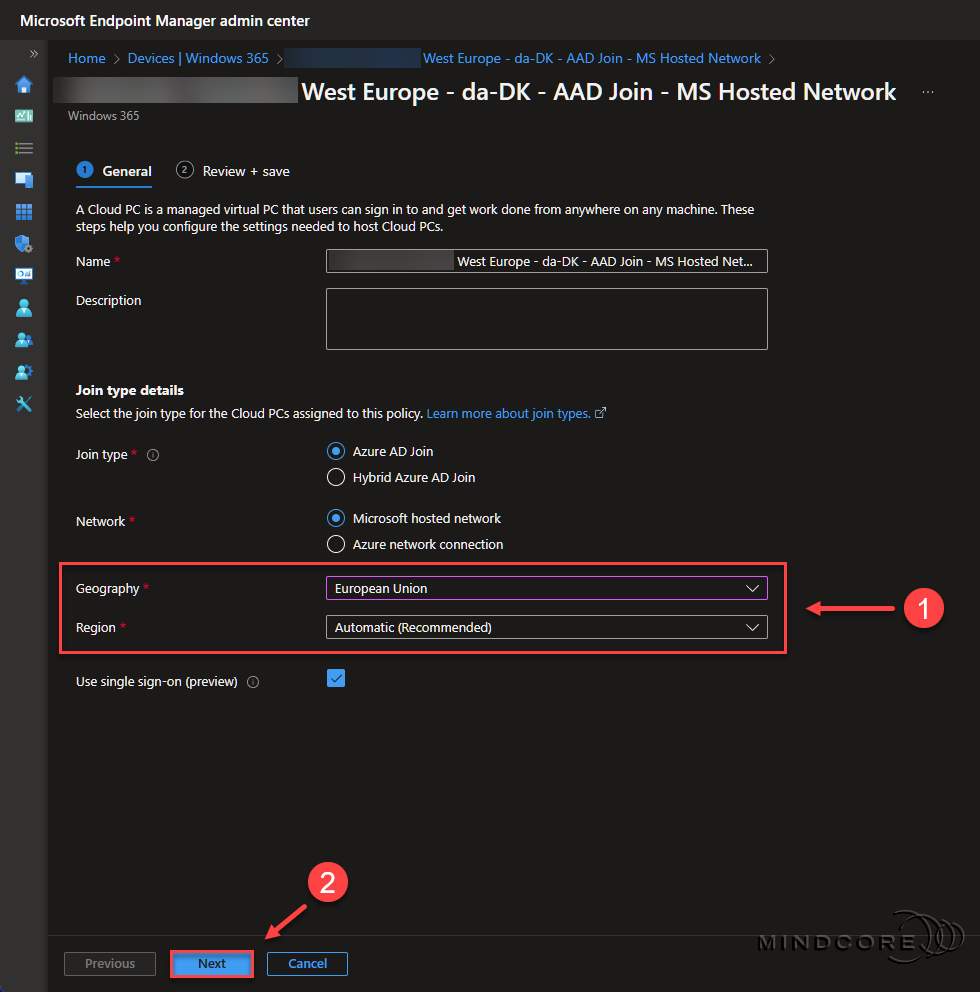
Change the Geography and set the Region to automatic, or select a region closest to your end users. Click Next.
Note:
– Automatic (Recommended): The Windows 365 service automatically chooses a region within the selected geography when provisioning, which decreases the chance of provisioning failure. – A specific region: Ensures that your Cloud PCs are only provisioned in your chosen region.
Tip: You can use Azure Speed Test 2.0 to measure the latency from your web browser to the Blob Storage Service in each of the Microsoft Azure Data Centers.
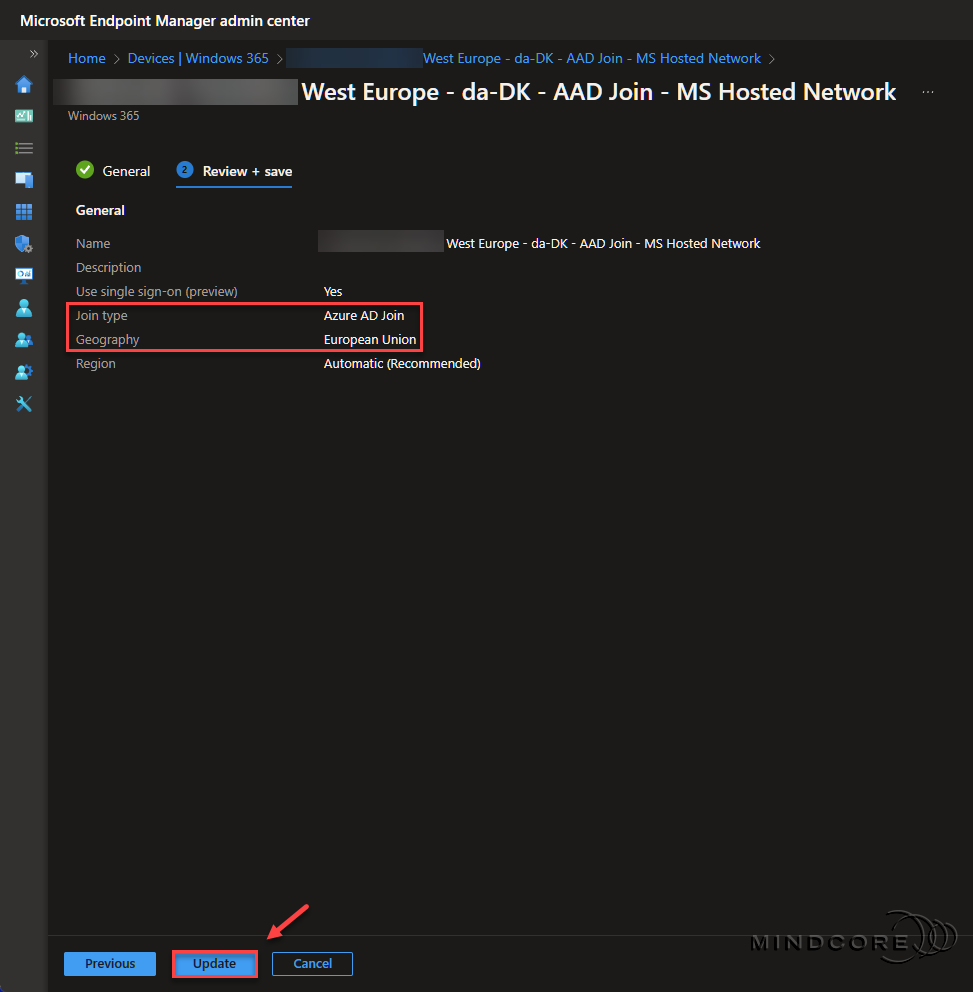
Review the configuration and click Update.
Reprovisioning the Windows 365 Cloud PC
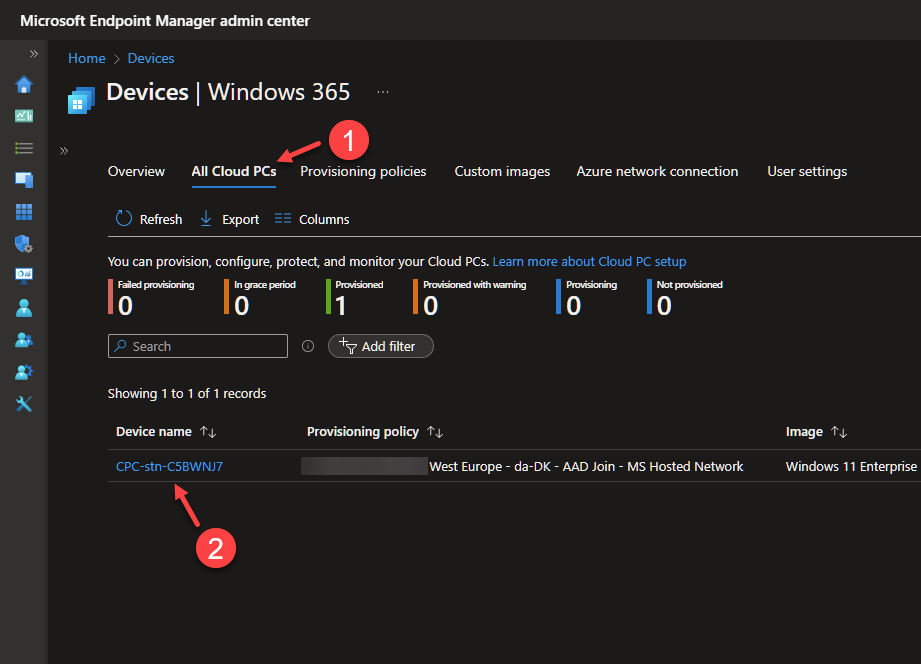
From Devices | Windows 365, click the All Cloud PCs tab. If you’re provisioning a new Cloud PC, it will appear on the list after approx. 20-30 minutes. Otherwise, select an existing Cloud PC to reprovision. – For this post, I chose to reprovision an existing Cloud PC.
Important: If you change the network, single sign-on configuration, or image in a provisioning policy, no change will occur for previously provisioned Cloud PCs. Newly provisioned Cloud PCs will honor the changes in your provisioning policy. To align the previously provisioned Cloud PCs with the changes, you must reprovision those Cloud PCs. Source: Microsoft Learn
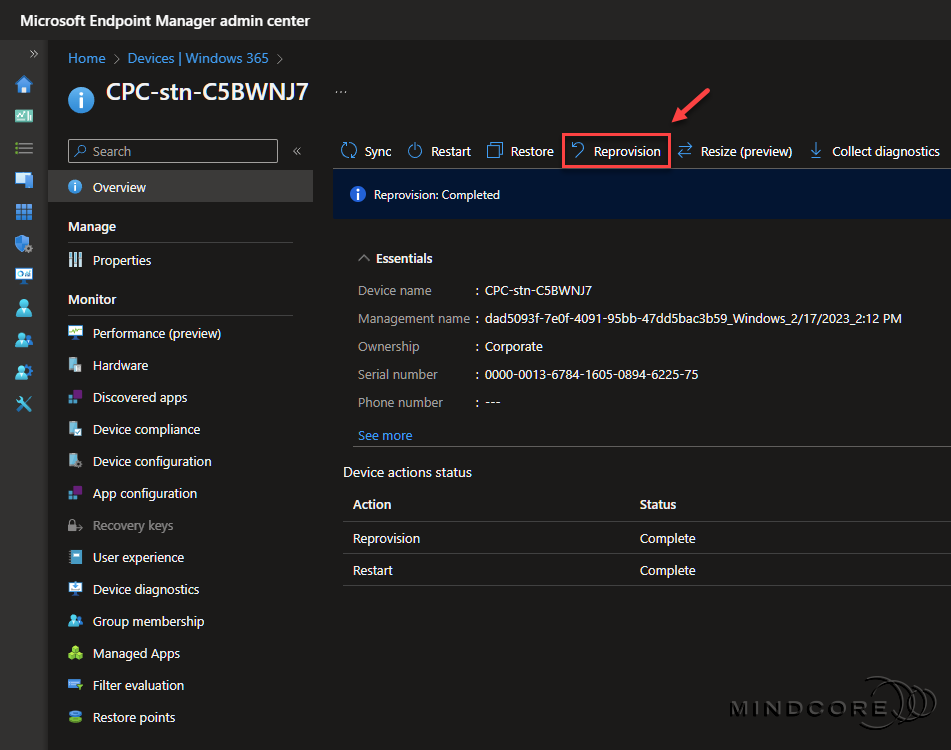
Click Reprovision. If all goes well, the new reprovisioned Cloud PC should appear on the All Cloud PCs list after approx. 20-30 minutes.
With these few steps, we have configured the provisioning policy to use the Azure region closest to our end users and provide the Windows 365 Cloud PCs with the lowest possible RTT.
Remote Desktop Protocol (RDP) Shortpath for Public Networks
I planned for this section to describe, among other things, how we can enable Remote Desktop Protocol (RDP) Shortpath on Windows 365 Cloud PCs, which in the past required adding a single registry value to them. – But this is no longer required since RDP Shortpath is now enabled by default in the back-end after it became generally available in December 2022.
What is Remote Desktop Protocol (RDP) Shortpath for public networks? Remote Desktop Protocol (RDP) Shortpath builds on the Transmission Control Protocol (TCP) connection and establishes, when possible, a direct User Datagram Protocol (UDP) connection between the client and the session host (For example, Windows 365 Cloud PCs). – This direct UDP connection delivers improved reliability, lower latency, and higher available bandwidth. By default, RDP Shortpath tries to establish a connection using UDP and uses a TCP-based reverse connect transport as a fallback connection mechanism. TCP-based reverse connect transport provides the best compatibility with various networking configurations and has a high success rate for establishing RDP connections. Source: Microsoft Learn
Direct and indirect UDP connections (STUN and TURN)
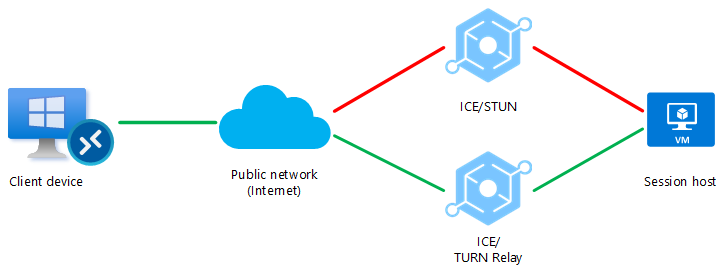
Two connection types are available when using RDP Shortpath for public networks. – A direct UDP connection using the Simple Traversal Underneath NAT (STUN) protocol between a client and the session host and an indirect UDP connection using the Traversal Using Relay NAT (TURN) protocol with a relay between a client and session host. ** ** TURN is currently in preview for Azure Virtual Desktop (AVD) and is NOT supported by Windows 365 yet.
See How RDP Shortpath for public networks work | Microsoft Learn
Note: RDP Shortpath uses a secure connection using TLS over reliable UDP between the client and the session host using the session host’s certificates. By default, the certificate used for RDP encryption is self-generated by the operating system during the deployment.
Outbound connectivity is required between the client and the session host to ensure that RDP Shortpath for public networks functions as intended. Therefore, the network must allow UDP traffic on port 3874 and port range (49152–65535 by default). – IT Admins can limit the port range used to listen to the incoming UDP flow.
Example of RDP Shortpath scenarios
I’ve borrowed some illustrations from Microsoft Learn that explain the two connection types well. Scenario 1.
The first scenario establishes a direct UDP connection (STUN) between the client and the session host over a public network (Internet). UDP is allowed through a firewall and other network devices. – If the direct UDP connection is blocked, it attempts to use the indirect UDP connection (TURN) instead (See scenario 2).

Scenario 2. In the second scenario, a firewall or another network device blocks the direct UDP connection (STUN). However, an indirect UDP connection can still be relayed using TURN between the client and the session host over a public network (Internet). – If firewalls or other network devices block UDP traffic, the connection will fall back to a TCP-based reverse connect transport.
Enough “talk”. – Let’s see some results!
Note: Both the Remote Desktop client and the Windows 365 app supports RDP Shortpath.
Okay, let’s reuse a screenshot from earlier where the connection is WebSocket (TCP). If we look at the round-trip time (RTT), it is pretty good because I’ve chosen an Azure region closest to my home, and the available bandwidth is okay, but could RDP Shortpath further help us improve these numbers?

The answer is yes! And I’ll just let the numbers talk for themselves. – Amazing!
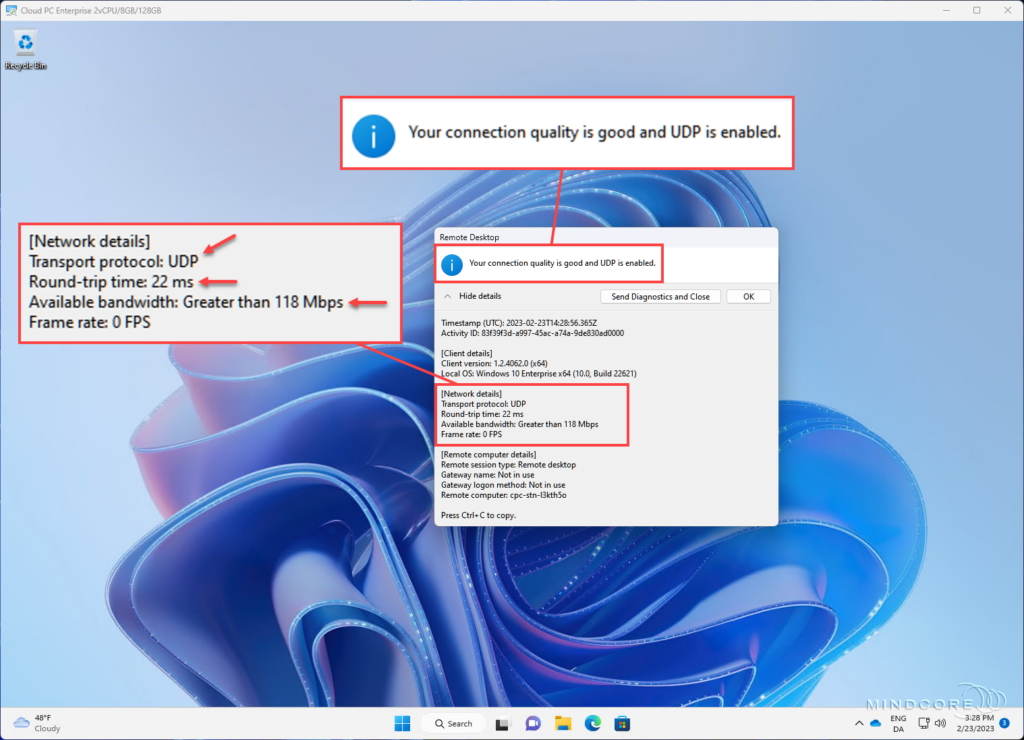
That concludes the section about RDP Shortpath. – In this section, we learned what RDP Shortpath is, and we verified that it could further reduce RTT and significantly improve the available bandwidth on our Windows 365 Cloud PCs. That’s it for Part 1. Please join me in Part 2, where we’ll explore Microsoft Teams Optimization, Azure AD join Single Sign-on (SSO), and Windows 365 Localization.
Last updated
